|
elektonic Home Fireworks SparcZ Win32 asm Linkz page Kerala Guestbook Misc... About me XXXXXXXX 3621 |
DIY (Do-It-Yourself) Opamp based MOSFET Amplifier 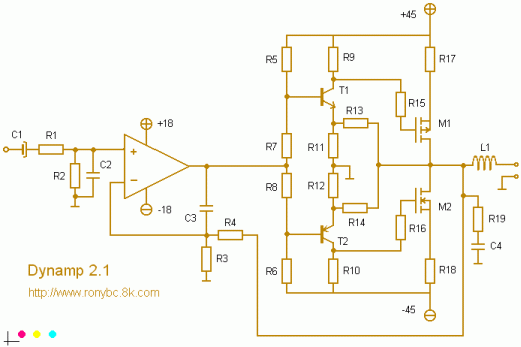 THD, Noise Ratio,...etc : Tolerable to most human ears. Output Power : Dynamitic, long whistling inside my head after it is switched off. The advantages of this amplifier are.. it is opamp based, simple and easy to build. I'm lacking an oscilloscope to tell you how contaminated the output wave is. It is a product of trial and error engineering..! No matter how Lo-Fi it may be.. the overall listening quality is pretty good. There is no point in relating the performance of this amp with its lacking circuit complexities or component counts. The idea behind this one is... the most performing simple design :) This thing exhibited properties similar to a dynamite couple of times during the development era, smoke'n'sound after switching on. That's why i named it The Dynamp..! Download LTspice/SwicherCAD-III free from Linear Technology website, its a very useful piece of software. And download the LTspice model of this circuit to simulate it with LT1022 opamp. Dynamp version 2.1 uses separate supply rails (+/-45V) to the MOSFETs. ie. The output voltage swing is not limited to opamp supply rails. LTspice simulations successfully delivered 28Vrms into 8ohm load (input: 1.6Vp-p @20kHz), that's 100 Watts, more watts can be obtained by increasing supply voltages. I didn't construct this new version of Dynamp yet. But I'm sure that it will perform very well, I have to wait until the next consumer arise... Important: Use 100k presets for R5 and R6. Pay attention to their values whenever you change power supply voltage or applying voltages for the first time. When you do so... Set the presets to their maximum (100k) before turning on the amplifier, connect an ammeter in series to either one of the power supply rails and turn on the amp with input grounded. Adjust the presets R5 & R6 so that the quiescent current is around 40mA. Keep the values of both presets as near as possible, otherwise the network will slightly load opamp output. The procedure might be a little annoying.. but remember the moralities of this design. Source resistors R17 & R18 are used to provide some negative feedback and thus linearize the MOSFETs. Else the behaviour of bias setting presets R5 & R6 will be too difficult to adjust, I mean the gap width between 'required quiescent current' and 'full conduction of mosfets'. Maximum output power can be raised by increasing power supply voltage to the output stage. I saw giant 5000Watts sine waves by computer simulation..! Truly.. my heart pumped more blood by seeing it. Didn't find much joy after going beyond that... better simulate some nuclear explosions :) Components List:
Reference: 1. International Rectifiers HEXFET Application Notes.Tips: 1. Use fuses wherever they are needed..! Copyright ® 2004 ronybc Hi-Fi design laboratory. |